![]()
Gallery Glass Clings are generally intended to be independent Suncatchers that you make on a horizontal surface, peel off and mount on a vertical surface. However, if you make a series of related suncatchers, you can mount them on a window that looks like you did it flat. This use of Clings is called the Modular Method. We haven't done many posts in the Modular Method category, and this post may be your first introduction to the technique. You can either make the snowmen, trees and house to put them along the bottom of a window. Or you can tie them together with pre-cured Liquid Leading squeezed out to make lines-- or of course, you could use Redi Lead to connect them together. I dug into the Gallery Glass Archives and found this same set of Clings used in a window motif--with some helpful how-to photos. I decided to assemble a version of the window to display at Plaid during January so I added some playful snowmen. However, I think it would have been more colorful if I had used Teddy Bears, but it's too late for that. I also decided that it was best to give you all the information and let you decide where you wanted to start--and stop with Gallery Glass Clings.
Note: I left the captions under the pictures so that you can just scan the technique, but if you really decide to do a modular window, please read the instructions. There is a lot of shared experience in these paragraphs.
How to Make ClingsGallery Glass Clings are easy and fun to make These are two simple steps to follow:
First, lead the designs with Liquid Leading.
Next, fill in the areas created by the lead borders with Gallery Glass paint.
Positioning Your PatternChoose a Cling design, draw your own design, or adapt one from another source such as a coloring book. Place the pattern under a GG Leading Blank with the smooth side up. Clings will not stick to the window, if make on the rough side of the Leading Blank.
Surface Alternative: Trace the designs for your project, cut them out, and tape them onto a piece of cardboard that will fit into a food storage bag. Make the Clings on the outside of the bag. Peel off and use the bag for new designs.
Outlining the Cling Design with Liquid Leading
Before you begin, protect your work surface with white or light color poster board,
Note: Decide if your Cling is too detailed for a 1/8" bead of leading from the bottle. You may need to use a Tape Tip. Instructions to create this narrower bead are given in this blog under the Leading Tips Category.
1. Prepare the Leading bottle: You bottle probably already has a hole, so remove the tip and remove the protective seal. Hold the bottle upside down and tap it firmly on a hard surface to force leading into the tip.
2. Practice leading: Reap step 3, then practice that technique on notebook paper. When you feel comfortable with the technique, begin leading your project.
3. The grip: Hold the inverted bottle in "broom handle" fashion in a vertical position. Do not rest your elbow on the work surface; it will inhibit your movement.
4. Making a bead: Squeeze the bottle. As the leading begins to flow, "anchor" (or touch) the leading to the surface where you want to begin the line. Apply even pressure and a uniform cord of leading will form. Raise the tip of the nozzle above your work surface before moving forward. The "cord" of leading will drape down onto the pattern line as you squeeze the bottle,
following your pattern as you move forward. When you get near the end of your pattern line, stop squeezing and lower the tip to your work and allow the bead to intersect with previous lines. By stopping pressure BEFORE the end of the desired line, a bump of extra leading at the end--is prevented.5. Drying: The leaded project must dry for at least 8 hours before adding paint--longer if conditions are humid.
6. Correcting mistakes: After the leading is dry, use your fingernail to pull up any unwanted leading and snip off or trim it away with small scissors. Lay the leading line that remains back on the Blank and press firmly in place. Do not use a craft knife on the Leading Blank.
Carol's Tips for Leading Messy lines: Uniform lead lines are achieved by dispensing leading ABOVE the surface and by coordinating your pressure on the bottle with your forward movement. Practice on notebook paper until you have mastered this skill. I practice making lines and grapes until they look smooth and uniform.
Beginning Bumps: If your leading curls up around the bottle tip as you begin to squeeze, you are not "anchoring" the leading to the plastic soon enough or you need to wipe the tip with a paper towel before beginning the line.
Ending bumps: If tails or bumps occur at the end of a line of leading, stop squeezing sooner than you are--well before you reach the end of the line--and bring the tip down to allow the bead to end on the plastic or a a previously leaded line.
Painting the Cling with Gallery Glass Window Color (bottle in illustration is an older version of Window Color) Note: Do not shake the bottles of paint unless they appear to have separated, because the paint will get thinner, making it difficult to apply to a vertical surface without running. However, it is fine to use on horizontal surfaces, regardless of the viscosity.
1. Remove the cap. Clean out any dried paint you see in the tip. You can push it to the side, easing it out of the bottle, remove the dried paint and replace the tip firmly into the bottle by snapping it into place.
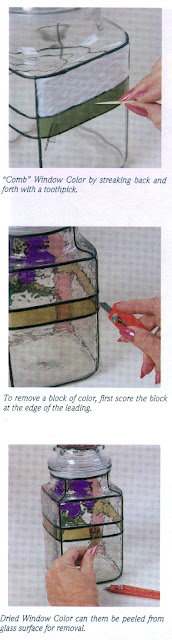
2. Coloring: Begin adding paint into your leaded design by squeezing it around the perimeter of the leaded area, then fill in the center. (see photo)
Be sure to apply the paint up on the leading, using it as a bumper while you are applying the paint. Failure to do so will leave light holes or a lighter "halo" next to the leading. The paint up on the leading will not show when the Cling is cured. Add a generous amount of paint up to the top of the leading, but do not add so much that it sticks up above the leading. If the colored area is too thin, the cured Cling may tear during removal from the plastic. Use a nutpick or a toothpick to evenly distribute the paint in the section. (See photo)
3. Combing: To minimize bubbles, "streak" back and forth in the paint to smooth the texture and pop the bubbles. Be careful when combing on plastic bags.
4. Tapping: After combing, more bubbles may be popped by "tapping". Hold the Leading Blank or piece of cardboard firmly in your non-painting hand and tap directly under the combed section with a pencil, the acorn end of the nutpick or the inverted bowl of a teaspoon. If using plastic bag covered cardboard, tap more firmly. (See photo)
5. Clean-up: If you spill paint on clothing or another surface, wash it off immediately using soap and water; do not allow it to dry before removing it.
6. Drying: Allow the project to dry for 24 to 48 hours on a dry, flat surface with good air circulation, such as the top of the refrigerator. Drying time may vary depending on the thickness of the paint and the humidity. All cloudy areas must turn transparent before proceeding.
Removing the ClingAfter the Cling has cured, it can be removed from your project surface (Leading Blank or Plastic Bag). Like magic, the leaded and painted design will peel up as one piece. The Cling can now be placed on a clean window or mirror where it sill adhere-- without addition glue or adhesive--until you wish to peel it off.
Carol's Painting TipsSize: When designing your own Clings, limit the size to approximately 5"x5" for maximum durability.
Segmenting: Designs should be segmented so each color has a closed section. Add lines to your design where needed before the leading step. This step also adds to the look of real stained glass.
Holes: Small "light" holes in corners of painted sections can be eliminated by dabbing Liquid Leading over the hole. This method is less noticeable than re-coating the section with paint, or trying to patch just the gap with wet paint.
Changing a color: Change your mind, or someone put their finger in the wet paint? Wait until the Cling dries, remove the Cling from the Blank or plastic bag, and use small scissors to cut the paint as close as possible to the lead line and remove it. Place the Cling on project surface, press flat and apply more colors. Let the new color dry thoroughly.
Darkening a color: To intensify a color, you may apply more than one coat. Let each coat dry before applying the next.
Lightening a color: Paint may be lightened by mixing it with Crystal Clear before applying. Pour it into a foam cup and mix with a craft stick, then pour back into one of the bottles for application.
Cloudy look: All Gallery Glass paints have a milky appearance immediately after application, but they will be clearer whey dry. Some colors dry transparent (like Crystal Clear) and some dry translucent (like Snow White). Experience will show you which are more and less transparent.
Bubbles: Small air bubbles that are hidden under the surface during application can sometimes add to the realistic stained glass look. However. eliminate large bubbles for a more uniform coating either by using the tip of the bottle or a "pick" for popping. Be meticulous about Combing and Tapping. They are essential for a bubble free professional looking project.
Window Application, Removal & StorageWindow Application: Place the Cling on a clean window or mirror. Smooth the design from the center outward to avoid air bubbles. Note: Do not place Clings on moist windows that sweat in Winter.
Removal: To remove the Cling from a window, life the edge and pull gently. In cold weather, Clings may shatter if the glass is too cold. If it seems brittle or resists removal, warm it first with a hair dryer. In warm weather, the Cling can stretch during removal--wait until the glass is cool to remove it (like at night).
Reusing: If the Cling will not stick when reapplying, clean the back with a paper towel moistened with window cleaner before putting it on a completely clean window.
Storage: To store Clings, ideally place them on Leading blanks, press out any air bubbles and store in a plastic bag. Keep them cool and flat until ready to reapply. The bag is essential to keep the Clings flexible over time. Never store any Gallery Glass project in tissue paper, The paper fibers will adhere to the surface. However, paper fibers can sometimes be removed with a wet cloth and serious rubbing. Also, don't store in bubble wrap, the bubbles will leave bumps in the surface of the cling.
Making a Scene on a WindowYou can use individual pre-made Clings connected together with lead strips to decorate a whole window for holidays or every day. Choose the Clings you wish to display. The pattern size for some elements of the design may need to be adjusted with a copy machine to keep "in scale". This must be done before leading and painting. Also make duplicates of the designs that will be used more than once in the
completed scene --such as trees. Place the individual Clings in the desired location on the window.
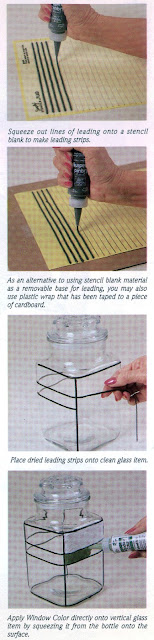
Making Lead Lines for Window Scenes1. To ensure smooth, straight leading, use a piece of notebook paper for a pattern. Place the smooth side of a Leading Blank over it. You may use plastic covered cardboard instead of a leading blank, as described earlier in this project.
2. Calculate the number of feet of leading you will need. Be sure to make enough lines to complete your project. You can usually get approximately 25' of leading on one Blank.
3. Prepare the bottle and hold it "broom handle" fashion in a vertical position. Do not rest your elbow on your work surface. (See earlier Leading Instructions and Tips for more information.)
4. Squeeze a line of leading down each line of the notebook paper. Don't worry about blotches or mistakes; they will trimmed off later. (see photo)
5. Let the leading dry thoroughly, at least 8 to 24 hours--longer if humidity is high.
6. Thoroughly clean your window with glass cleaner.
7. Peel up the cured lead strips. Use small scissors to trim any blotches or irregularities from the leading before applying them. Then press them onto the clean glass. Do not stretch the strips as you are applying them. Strips can be pieced together, if you have a pattern line longer than your strip, by putting them together end to end. Do not handle your strips more than necessary. Small gaps will be filled in later. Intersecting lines should be trimmed with small scissors so that they meet cleanly; do not overlap leading strips.
(see photo)
8. Connect strips to Clings as needed and continue on to the edge of the window. Make sure all the background is segmented with leak strips. Touch up any gaps by filling in with Liquid Leading squeezed from bottle onto glass. Let these gaps dry thoroughly before applying Gallery Glass paint.
Applying Gallery Glass Paint to Window ScenesYou may want to fill in the blank areas of your design with color. This is easy to do because Window Color can be applied to a vertical window surface. Note: Do not shake the paint. For best results, apply paint in one section at a time. The amount of paint you will need varies depending on the size and type of your project. For vertical application, allow one bottle for every square foot. (This quantity is approximate; coverage varies with depth of application.)
![]()
1. Start with a section at the top of the window and run a thin bead of paint across the top of the section, overlapping the lead line above it. Be sure to cover the corners. Squeeze gently and move the bottle side to side as you move downward. If the paint begins to run, you are applying too much. Use the tip of the bottle to spread it thinner. Use less paint towards the bottom of the section because it may slide downward. Always complete an entire section before beginning another section or taking a break. Be sure to paint to the edge of the section to avoid light holes. (see photo)
2. Comb the paint with a toothpick or nutpick. Hold the pick perpendicular to the glass. Start at the top of the section and streak back and forth in the paint from lead line to lead line until you reach the bottom of the section. This will smooth the bumps, pop the bubbles, and give a directional grain to the paint. Comb similar sections in the same direction. (see photo)
Removal of Scene from Window: If you wish to remove the decoration, you can save the Clings by scoring around them with a craft knife and pulling them from the window. Store them in the same manner described above. Also score the background from the window frame and peel off the entire painted area and the added leading strips.
![]()
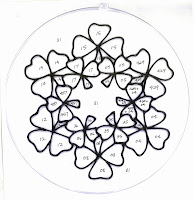
This sheet is a little tilted, but hopefully, it allows you to print all the patterns on one sheet. If they print out on an 8 1/2" x 11", you should enlarge them to 129% --if you want them to be the same size as mine. I put these Clings on a 24"x36" poster frame. I know--that's cheating--but I didn't have a window to put it on and I wanted to complete the samples so that I could post it during the holidays. I'm sharing this so that you can get an idea of scale. Your window probably won't be the same shape or size, but the finished photo gives you an idea of how you can arrange the "hills" of snow. Print the sheet several times because you will need multiple trees and multiples of both snowflakes.
The numbers on the patterns are not the colors that I used for the sample, but you can choose you own colors. Here are the ones I used: (I shaded the tops of the snow segments with Hologram Glitter and the bottom of the segments with Bluebird. The middle was filled in with White Pearl combed in a swirly motion. Snowflakes are Hologram Glitter.
Supplies:
16076 Liquid Leading, 16004 Sunny Yellow, 16005 Orange Poppy, 16007 Cocoa Brown, 16008 Kelly Green, 16011 Blue Diamond, 16021 White Pearl, 16024 Ivy Green, 16081 Crystal Clear, 16441 Silver Glitter, 16442 Hologram Glitter, 16636 Autumn, 17054 Copper Metallic, 17072 Gilded Oak 17073 Bluebird.


 The problems I encountered during the painting phase were new challenges for me-- because I don't ever remember painting something that needed to look OLD! I'm not smart enough to "age" the project as I painted it, so I cheated. I painted it with normal colors, then I "distressed" it with Copper Metallic. Here is a picture of it before the distressing. As a co-worker pointed out--"it's too pretty, it makes you want to live there!" That's not a particularly desirable comment to have made about a Haunted House. So I began working to make it more ominous. I first took Copper Metallic and topically applied it to the porch railings in a random "woodgrain" pattern. Then, I decided that the concrete porch looked too clean, so I applied the CM in lines to look like boards. Then the door looked much too clean, so I streaked it on the door. Then I realized that the Copper Sparkle on the turret and the fishscale shingles was much too bright, so they were next. That only left the sides of the house and --you guessed it, CM, why not? Then the co-worker said that we needed at least one bat--so I added it to the less cluttered sky area.


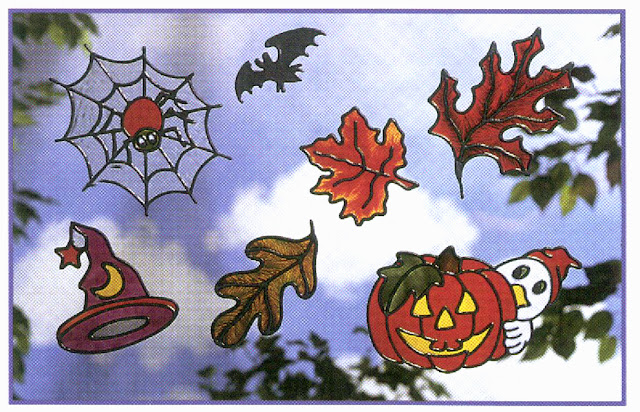


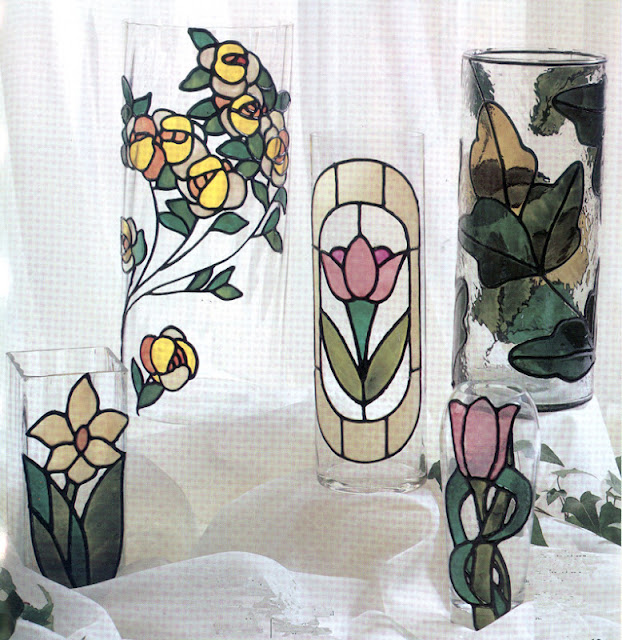
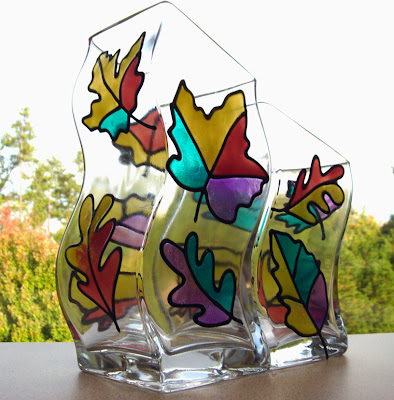 Autumn Suncatchers "light up" Clear Vases