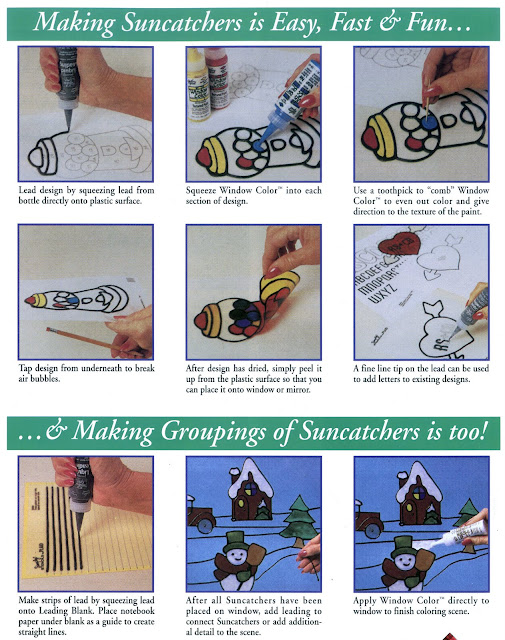
The vertical application is used to create Gallery Glass designs directly on windows and other vertical surfaces. There are four basic steps:
(1) Preparation
a. Choose a design and colors for your room. Measure your windows and alter design to fit your window. Draw a pattern to fit your window pane. Patterns can be reduced or enlarged on a copy machine to fit your window. To enlarge a pattern dimension, add borders or make the borders wider. To reduce a pattern dimension, trim borders or make them smaller.
b. Gather supplies. Allow 2 oz. of paint per square foot.
c. Practice laying the leading strips on the surface you will be using. Get the feel of the paints. You can peel off practice areas before you start--for real.
d. To protect window, cover dividers and sill at the bottom of each pane with masking or painter's tape. Place newspaper on the floor under the window. Remove tape after paint sets up but before it is dry. Remove excess paint from dividers during application.
(2) Make leading strips with Liquid Leading or use Redi-Lead. Carefully estimate the amount you will need for the whole project. Measure and add together the lengths of all the lines in the pattern. Multiply the total by the number of times the pattern will be repeated on your window(s).
(3) Outline the design
a. Thoroughly clean the inside and outside of the window with glass cleaner.
b. Tape your pattern on the outside of your window so you can see it from the inside. If you can't access the outside of the window, transfer the pattern to the glass, using black transfer paper. Repeat transferring pattern as necessary to get entire pattern on the glass.
c. Working one strip at a time, pull up the Redi-Lead strips and press them to the glass, following pattern lines. Continue until all pattern lines are covered with leading strips. Trim corners and intersections so that there is only one layer. Don't go over lines or overlap the strips. Don't pull or stretch the strips as you apply them. Don't handle the strips more than necessary. Piece long lines by placing them end to end. When lines intersect, trim (miter) them neatly with a craft knife.Touch up gaps when you're finished by squeezing a small amount of Liquid leading over the gaps.
(4) Paint the design
a. Holding the tip of the bottle against the glass, apply paint to one section at a time. Begin in top left corner and run a thin line of paint across the top of the section and the leading above it. Be sure to cover the corners. Squeeze gently, and move the bottle with a wiggling motion side to side, working downward in horizontal rows, filling in one section at a time. Be sure to cover the corners and paint to the edge of the leading to seal the leading strips to the glass and avoid light holes. Always complete an entire section before beginning another section or taking a break. Don't shake the paint before applying--it will become too thin for vertical application. If it runs, you're applying too much paint. Use the tip to make it thinner and spread over larger area. Apply all paint straight from the bottle. Use less paint as you get to the bottom of a section; otherwise the paint may slide or droop. If you spill paint on clothing, wash it off immediately, using soap and water. Don't allow it to dry. Immediately wipe up spilled paint on window sill, sash, or frame with a damp rag. If paint dries on woodwork, spotting may result.
![]()
b. "Comb" the wet paint immediately with a toothpick or nutpick, working back and forth to create smooth, even color and to pop bubbles.
c. Complete Removal: Use a craft knife to score the paint just inside the window facing around the perimeter. Remove the entire painted area by peeling the leading and color away from the glass. If paint doesn't peel easily, use a hair dryer to soften the paint
Painting Tips and Techniques:
If paint stops flowing, use a paper towel to push tip to one side and lift it out. Use nutpick or long pin to pull dried paint from inside. Replace tip and continue painting.
To eliminate light holes in the corners of painted sections, dab some Liquid Leading over the hole. Liquid Leading will be less noticeable than patching the gap with paint.
To change a color before the paint dries, use a cotton swab to remove the unwanted color. Then repaint.
To intensify or darken a color, apply another layer of paint after the first layer dries.
To lighten a paint color, mix paint color with Crystal Clear.
If you want a translucent, not transparent look, paint your design with Snow White, Canyon Coral, Cameo Ivory, or Rose Quartz. Although all Gallery Glass paints have a milky appearance in the bottle and until they are thoroughly dry, these four colors have a cloudy translucent appearance when dry.
![]()
Change your mind about a color or section? if needed, you can remove just one or a few painted sections that you wish to change. Wait until the paint is dry, then use a craft knife to score the paint inside the leading. Simply peel out the paint from that section. Clean the section before applying another color.
Does your Patio Door need to be more private? Or maybe you just need to block the light? This is one of the most common requests that I get. Many homes have sliders or patio doors, as they are sometimes called. And they are extremely difficult to cover because they MOVE. Even a Gallery Glass solution is not an easy one because of the heigth in proportion to the width. Here is one pattern that will work. The two center sections have been left un-painted, but you can paint them if you need privacy.
Simulating Real Glass on Your Window:
Gallery Glass creates a realistic look because of its thick consistency. All hand-rolled glass has texture, and Window Color allows you to choose bumpy or smooth effects, depending on the application technique. Practice and experimentation will make unlimited variety and creativity available to you. You may want to experiment on the window or a separate piece of glass before beginning your project. Sponges, artist paint brushes, and small stencil brushes can produce very different textured patterns.
![]()
Cathedral - Use the method of color application described earlier in the post to achieve the look of textured, cathedral stained glass, or experiment with any of the special effects listed below.
![]()
Opalescent - Translucent Window Color such as White, marbleized with one or more colors. Place drops of one color in an area, then fill in with a second color. Use the bottle tip or a toothpick to swirl the two colors. Do not overmix. Translucent colors used for both the dots and the background look more like opalescent glass.
![]()
Glue Chip - Etched, fern-like designs on clear glass. This is a very popular look. A similar effect can be achieved by using the marbleizing technique with Snow White dots and Crystal Clear as the background.
![]()
Wispy- Two or more colors marbleized into a clear background. Place dots of two colors on the glass, then fill in with Crystal Clear. Use the same technique as Opalescent.
![]()
Feathery - Use a very soft flat brush. Put paint in a shallow cup and dip the tips of the bristles into the paint. Begin at the top and make a comma stroke to the right and one to the left. Continue in rows until the entire section is filled. The result is a quick, easy, feathery texture that covers a large area economically. Crystal Clear or Blue Diamond work best for this technique.
![]()
Etching or Stucco Texture - Use a stencil brush and a paper plate. Load the tips of the bristles with a small amount of paint. Use a pouncing motion to cover the section very sparingly. The finish looks similar to etched glass. This is an excellent finish for mirrors. Use Crystal Clear or Blue Diamond for best results.
![]()
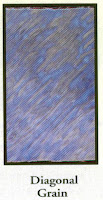
Vertical, horizontal or diagonal Grain - With the applicator tip touching the glass, apply the paint thinly in streaks. You can also use a toothpick to "comb" the paint to create a directional grain.
Opaque Colors - You can mix almost any shade of translucent paint by putting a bright color directly into a bottle of white and stirring well, then applying to the glass.
![]()
Shading - Put two colors next to each other in the same, then comb to blend the two together where they meet. This is perfect for flower petals, leaves, and fruits.
Pattern for Pink Rose Arch top:
Gallery Glass Supplies: 16008 Kelly Green, 16001 Crystal Clear, 16016 Rose Quartz, 16017 Magenta Royale, 16076 Black Liquid leading or Redi-Lead.
Pattern for vertical trellis:

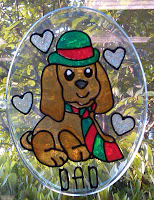
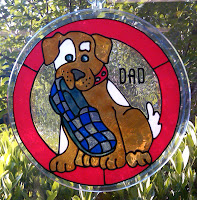 In my mind, Gallery Glass is a perfect way to spread it on thick because it is a gift they can't eat or wear--so it doesn't go away when you do. It's nice that special diets and "hard to find sizes" don't matter. In my mind, it's the "one size fits all" commemorative plaque. There are several ways to approach the project for fathers. You could go with the historical favorite "Man's Best Friend" motif. I couldn't pick out the "best" color scheme, so I decided to show you both of them. The style of the dog is a bit generic, but you could possibly tailor it to your man's favorite breed with a little imagination. It could become a Golden Retriever by just leaving off the spots and painting him Amber.
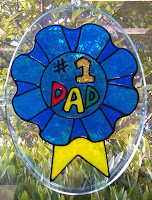
 The third approach is to give him an "award". Give him a blue ribbon (it's his favorite color) for being a great dad. Sometimes the easiest alternative is also the best one. Again, no oval blank, but you can do it as a suncatcher and apply it to the window closest to his favorite chair, where he will be able to stare at it after you leave and remember you fondly.